For this tutorial, it is helpful to understand the concept of a point spread function. Let's say we're trying to take a picture of a point source of light. Ideally, that point source of light will appear as a point source in our photo. However, in the real world, that point source will be slightly distorted for several reasons. Even in an optically-perfect lens, a point source can never be quite brought to perfect focus, because light interacts with the edges of the lens to produce a diffraction pattern called an 'Airy disk'. Most real-world systems also have aspects that create optical artifacts and distortions, such as support vanes, internal light baffles, or designs sacrificing perfect focus for smaller size or wider fields of view. Then there are some non-ideal situations. On more several occasions, spacecraft have had condensation on optical surfaces (Deep Impact infamously brought a little Florida humidity with it), forming a haze that both spread the light over several dozen pixels and dramatically reduced the amount of light getting through. Motion blur can be also considered a special case of a point spread function, where the light from a point source is smeared across the sensor.
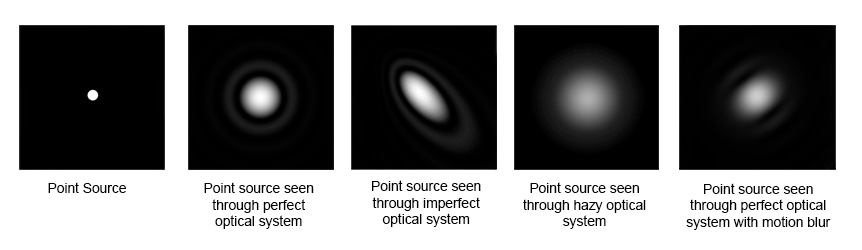
Example of point spread functions in various situations
A point spread function is an equation that says "for a given amount of light hitting a point on our lens, here's where we will see light on the sensor" (in math terms, this is a "convolution" function). Deconvolution is a process that attempts to reconstruct the original point source by reversing the point spread function. It asks, "Given a distribution of light on the sensor and a known point spread function, what did the source originally look like?" The goal of this recipe is to find a close approximation of a point spread function in a photo, then feed it into a deconvolution algorithm that works on the photo.
This tutorial explains how to recover some details from blurry spacecraft images. I'll be upfront: this is not a substitute for a crystal clear picture. The results won't be perfect. But in borderline images where the spacecraft got no do-overs, it can make or break a project. This is a really neat processing trick that was developed by Daniel Macháček at the UMSF forums for processing Voyager images.
To get started, you will need photo editing software of your choice (this tutorial will be with Photoshop CC), and ImageJ with the Parallel Iterative Deconvolution plug-in installed. Installing the plug-in is straightforward; first unzip ImageJ to the directory of your choice. ImageJ will be a directory, and inside of it will be a folder named "plugins". Simply unpack the Parallel Iterative Deconvolution zip file directly into the "plugins" folder, and you should be good to go. When you first launch ImageJ, it will bring up a dialog box asking for firewall access. This request is related to an automatic updating function, and the program still will work if you deny the request.
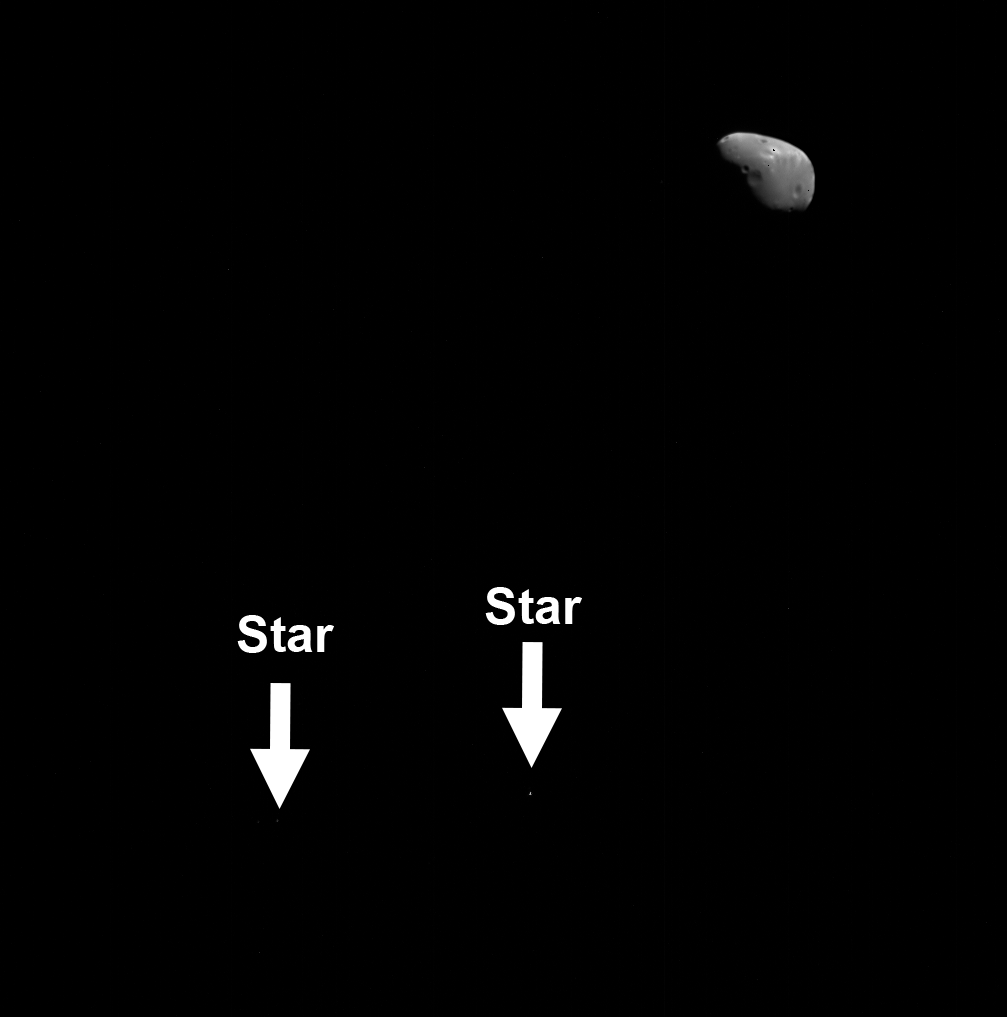
For this tutorial I am using a Mars Express Super-Resolution Channel observation of Deimos (hi782_0006_sr2.img). This is an astrometric observation, so the image conveniently contains several stars (an ideal point source!).
Our first goal is to reduce the sensor noise. There are a couple of dead pixels, so we'll fill those in with surrounding pixel values. The reason we want to do this now is because the sensor noise was added after the objects being imaged were originally convolved with the point spread function. So if we run through the noise through the deconvolution function, we're effectively adding noise to our reconstruction. Be very careful with noise reduction, though - if you are too aggressive, you may be erasing information you are trying to recover. Usually at this stage I limit noise reduction to removing "salt and pepper" noise, or pixels much, much brighter or darker than the rest of the image or other obvious noise like cosmic ray strikes.
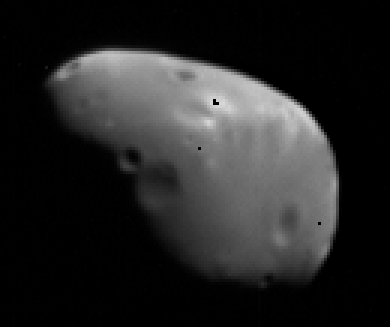
Boop. (Image enlarged 3x for clarity)
The next step is to isolate a possible point spread function from this image. In this case I'm going to use one of the fainter stars. My reason for doing this is that the brightest star in this image may have saturated the detector. In other words, so much charge accumulated on the detector that it was no longer capable of sensing more light. If this happens, we start losing information about the point spread function, and the deconvolution becomes less effective.

Here's the star, enlarged 20x. As you can see, the star's light is spread over a triangular region of about 10 px, and the brightest pixel is not at the center. This is pretty typical for Super-Resolution Channel images. I'm not sure why, but I think it has something to do with tracking instability as the spacecraft tries to keep a precise pointing during the observation. If you look closely, the black space surrounding the star has some sensor noise - we need to remove that for the same reason we removed noise from Deimos earlier. From now on I'm going to refer to the star as the "point spread function".
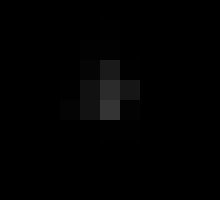
Noise-reduced version of the point spread function, enlarged 20x.
The next step is to crop the image around the point spread function (usually a 10 x 10 px or 15 x 15 px image works) and save it.
Now that we have a point spread function, it's time to move over to ImageJ. Open up the cleaned photo and the point spread function. Then go to Plugins -> Parallel Iterative Deconvolution -> 2D Parallel Deconvolution.
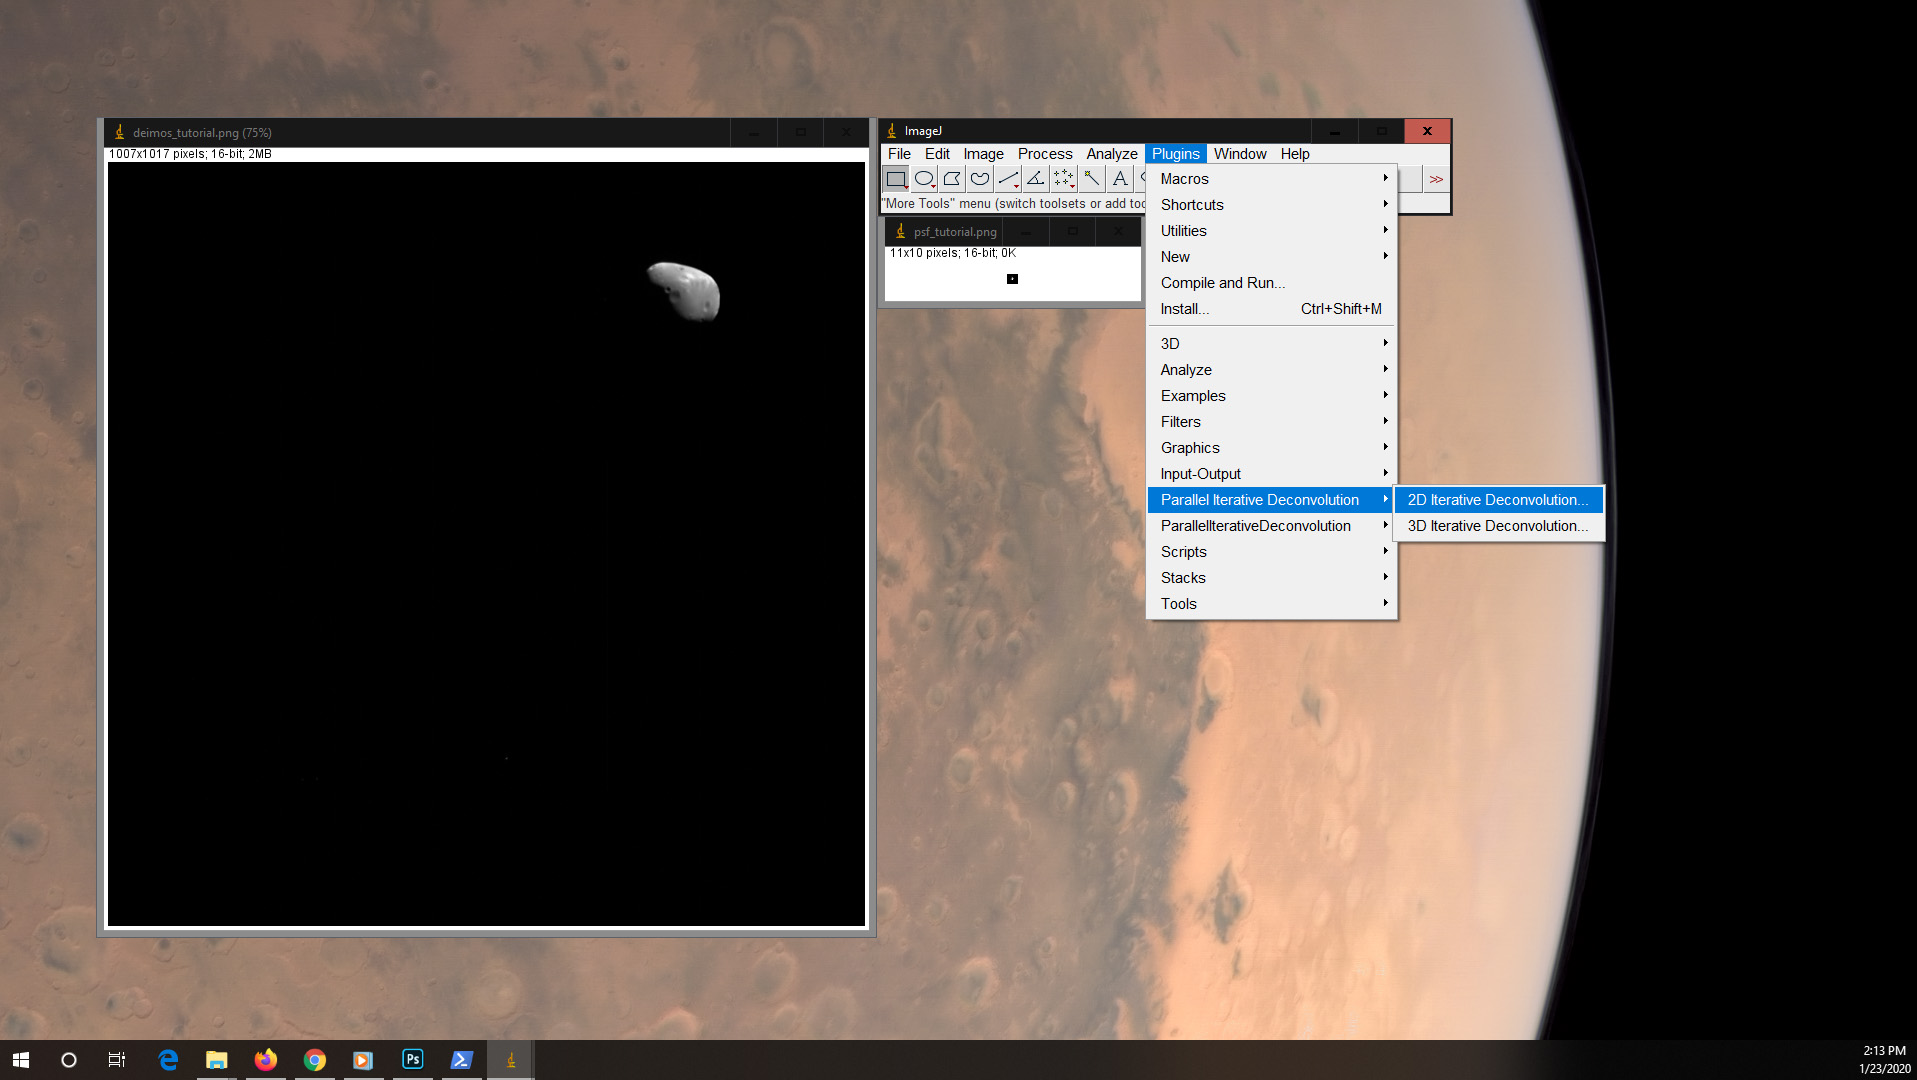
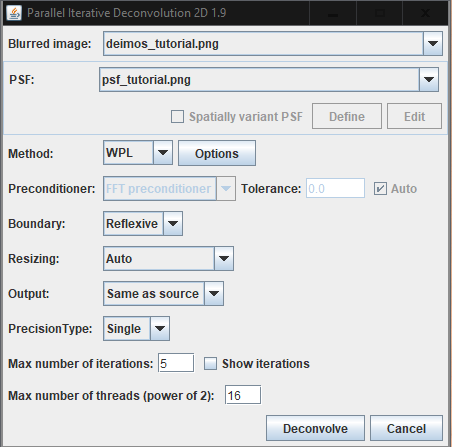
This will bring up a box. Set the image you're processing as "blurred image", the cropped image of the point spread function as "PSF", and change the method to WPL. (If you're interested in what's going on here, this is setting the deconvolution method to a form of Weiner deconvolution which attempts to minimize the effects of existing noise in the image.) There are some settings you can play around with in the Options box, but in my experience it's a lot of trial and error for marginal improvements. The default settings should usually do the trick. Click "Deconvolve" and go! Once it finishes, go to File -> Save As -> PNG and name the file.
Here's the results of the deconvolution flashed back and forth:
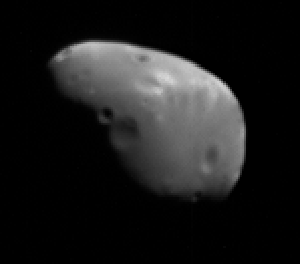
As you can see, the fuzzy edges are a lot sharper, and some small, shallow craters get a little more visible. If you notice, a lot of the speckle noise got a lot brighter -- that's why we want to remove it before we run the deconvolution function on it. There's also a little bit of a halo around sharp edges. This is an effect called 'ringing', which is one side effect of deconvolution. This is something that's relatively easy to deal with in post-processing. In images where the objects of interest are surrounded by empty space, a paintbrush usually does the trick, since the halo is well-separated from the object. If you're using this technique on a planetary surface that fills the frame, the halo is normally subtle enough that you don't notice it.
This tutorial uses an "easy" point spread function, but point spread functions can be derived from images where there are no stars. For example, if you're looking at a picture where the object totally fills the frame, small, fresh craters 1-2 px in size make an acceptable substitute. I've used this to sharpen images of Io taken by Voyager 1, which were affected by a clock problem that caused the scan platform to start moving to a new target before finishing a photo. As long as you can find a bright spot that approximates a point spread function, this technique can be an effective and powerful tool in your processing tool kit.